Salmon & egg wraps with mustard mayo

Ingredients
- 24 slices smoked salmon
- 6 hard-boiled eggs, cooled, shelled and sliced
- 2 x 100g bags baby spinach
- 12 large wraps, we used multigrain
For the mustard mayo
- 200g light mayonnaise
- 6 tbsp Dijon mustard
- 1 small red onion, very finely sliced
Method
- Mix the mayonnaise and mustard, divide into 2 small bowls, then stir the onion into one bowl.
- To assemble, spread a layer of the onion mayonnaise over each wrap and add 2 slices of smoked salmon, some sliced hard-boiled egg and a generous helping of spinach to each. Roll up tightly. The wraps can be made several hours ahead and kept covered in the fridge. To serve, cut each wrap on the diagonal into 2 pieces. Serve with the extra mustard mayo for drizzling.
Oiless Non-Slimy Okra Soup
 I can understand why some people do not want oil in their meals but I
wonder why anyone would want Okra Soup that is not slimy! If you
prepare Okra Soup in my home and it does not "draw", that's regarded an
ajo ite (badly prepared meal). O well, we like what we likne. :)
I can understand why some people do not want oil in their meals but I
wonder why anyone would want Okra Soup that is not slimy! If you
prepare Okra Soup in my home and it does not "draw", that's regarded an
ajo ite (badly prepared meal). O well, we like what we likne. :) Recipe for Classic Okra Soup: Classic Okra Soup.
Do you want to prepare Okra Soup for your kids? Then visit the Kiddies Okra Soup page.
Do you want to add Ogbono to your Okra soup? Then visit the Okra Soup with Ogbono page.
Recipe for Oiless Non-Slimy Okra Soup: Oiless Non-Slimy Okra Soup.
Ingredients
- 3 cups (150g) Okra
- 10 chunks of beef
- 1 cup cow tripe cuts shaki
- 1 cut dry fish (mangala)
- 1 tablespoon ground crayfish
- 2 big sweet peppers or tatashe
- 2 red onions
- 300g leafy vegetable (Nigerian pumpkin leaves or spinach)
- 1 big seasoning cube (beef flavour)
- Yellow habanero pepper (to taste)
- Salt (to taste)
Notes about the ingredients
- This soup does not contain palm oil hence we will use the sweet pepper to add some colour to the soup.
- Pumpkin leaves are the best for okra soup but for those outside Nigeria, this may be hard to come by so you can use spinach.
- You can also use dry cat fish, smoked or boiled mackerel for this soup.
- If using tatashe, remember that it is hot and spicy. If you do not like spicy food, skip the habanero pepper.
- If you do not have crayfish, use fresh shrimps or prawns.
Before you cook Oiless non-Slimy Okra Soup
- Chop the vegetables.
- Cut the okra into big chunks. The tinier you cut the okra, the more slimy it will be in the soup.
- Grind the crayfish.
How To Eat Fried Snails

Peppered.
Freshly made. Leftovers. Freshly warmed. Who cares?
On a toothpick. Or by hand.
Standing up. Sitting down.
By the dozen. Or half-dozen, belying your generosity. Not showing your greed.
A half-dozen, at the very least.
But one by one. One after the other.
Hard flesh, rubbery flesh, crunch. Juicy tentacles.
With rice. Delicious, freshly-boiled white rice.
Peppered and spiced. No garlic butter. Just yet.
Step 1 – How to remove snails from the shells
There are two ways I know how to remove snails from their shells: one easy…..and the other effective.
Hot water soak (Easy)
The first method involves a hot water soak, which lubricates the interior of the shells and enables snails to easily slip out. My father never liked this method, devoid as it is of the slime and grime of snails because it ‘softens’ the meat.
This method however, keeps the shells intact, and available for future ‘decoration’ opportunities.
Soak the snails in a bath of hot, just-boiled water. Let them sit for a few minutes, then using (2-pronged) forks, pierce the meat protruding from the largest part of the shell and pull the snail out.


Crack & Remove (Effective)
The second method is to crack the shell, using a mallet or a stone, as the market women do.


Both methods expose the entire snail, parts of which are not prized for eating.
Above the feet of the snail is a light grey sac, which occupies the spiral area up to the tip.

Edible foot to the left, Inedible sac to the right
It is full of fluid and the snail’s guts. This is removed by gripping the sac, where it connects to the foot and pulling it clean to reveal two tentacles which are juicy and delicious when cooked.
The sac/guts are discarded.
The final step is to split the foot open, along a natural line, using a small sharp knife.

Snail foot, prior to opening
This opens up to reveal some white flesh. And create a ‘butterflied snail’.

‘Butterflied’ snail foot, after opening
Step 2 – De-sliming and cleaning snails
Some people prefer to use lime when cleaning snails, others use alum. And thanks to a comment left by Dee/Calabar Hottie, I can add salt and garri as an additional cleaning method!
Cleaning Snails
From Snail Street:In 1980 a Chilean family established a snail farm with the intention of exporting snails to Europe for gastronomic purposes. But the family discovered that when handling the snails, the skin on the farmer’s hands became extremely soft. Injuries and cuts caused by the sharp snail cages healed quickly without becoming infected and didn’t leave scars. As snails can regenerate their own shell when diseased or damaged in the wild, it was soon realized that what restores a snail’s shell could also repair human skin.From Top News AE:According to Louis-Marie Guedon, slime is full of collagen, glycolic acid, antibiotics and compounds. They help in regeneration of skin cells. But this has also inspired a farmer, Mr. Guedon, of Champagnolles in western France. He has tried his hand in first industrial snail mucus business. He has even expressed his future goals that includes collection of 15 tons of mucus
With Alum
Cleaning snails with alum is the most common method in Nigeria. She says without blinking a single eye! Alum, as used in preparing snails is hydrated potassium aluminium sulfate (potassium alum) – a solid, crystalline chemical with astringent qualities and the ability to cut through grease and slime. And is also used in the cosmetic industry to stop bleeding when nicks and small cuts occur, and as a deodorant!
I believe it is the most effective solution when it comes to cleaning snails, not to mention how common and inexpensive it is.

Blocks of Alum
To clean snails, you begin by rubbing the alum over the snail – on the outside, and the inside, where it was opened up. It is important to massage every inch of the snail, especially the ‘hinges’, on the outside of the snail (where my thumb and index finger are in the photo on the left). That part of the snail acts as a pool, trapping slime so one has to ensure it is properly cleaned.


Once you are done cleaning with alum, rinse off the snails under a cold tap and check for residual slime. You should feel the snail’s texture and no hints of smoothness.
With Acids: Lime or Vinegar
Where alum is not available, it is possible to use limes/lime juice with their high acidity or vinegar. This works on the same principle as when used to cut grease. Though I enjoy the light, refreshing citrus fragrance when using limes, I have to admit my limited success in using it as a cleaning agent.

Put it down to my impatience.

It works the same way as alum – using lime quarters, and juice, rub the snails with the aim of removing all the slime off the snails.

It is quite possible to end up with ‘strings’ of slime, with superb adhesive qualities!
Once the snails are clean, give them a final rinse and then proceed with cooking, or storing.
They will keep refrigerated for a couple of days but I prefer to freeze them if I’m not ready to cook. To freeze, place them on a greaseproof-lined baking sheet till frozen hard, then remove and place individually frozen snails in a freezer-safe food bag or container. Freeze till required.
With Salt & Gari
Dee writes: ‘…… I’m usually a snail fan, however the process required ‘no be am’ and I don’t get the quality I have been spoilt with growing up when I purchase outside.
There is a method of cleaning snails that you did not talk about however and I’m almost certain the second half of it would help to cut the slime and clean the snail the way alum does in your lime method.
My mum never used alum because quick as it was, she had found that the crunch was always compromised.
She however taught us to wash with salt. Salt is sprinkled all over the snail and used to scrub the snail bodies. I must add, that the slime it produces is second to none. She would do this no less than 3 times and sometimes up to 5 times.
When she was satisfied that the body was smooth and the slime was not as dark yellow as when she had begun she would then use garri for the second step.
Garri (also known as gari, garry, or tapioca) is a popular West African food made from cassava tubers. The spelling ‘garri’ is mainly used in Nigeria, Cameroon, Sierra Leone….
Grains of Yellow Garri, before it is cooked in hot water and transformed to ‘Eba’To make garri, cassava tubers are peeled, washed and grated or crushed to produce a mash. The mash is placed in a porous bag and allowed to ferment for one or two days, while weights are placed on the bag to press the water out. It is then sieved (or sifted) and roasted by heating in a bowl. The resulting dry granular garri can be stored for long periods. It may be pounded or ground to make a fine flour’

The garri would be used to cut the slime and clean up the snail. She would do this roughly 3 times, wash and check for slime. If the slime had not ‘cut’ to her satisfaction she would give it a once over. It does sound tedious, …however the crunch never lied.
Step 3 – How to cook snails
I take this first step when cooking my snails. The essence is to cook the snails, prior to frying and saucing in a chunky tomato-chili mixture, which complements the chewy, rubbery texture of the meat.
To do this, I simply boil my snails for about 15 minutes.

For 20 medium–sized snails, I used a small pot and seasoned the meat with 2 teaspoons of regualr salt and ½ a red onion, sliced.

Step 4 – The crux of the matter/How to ‘pepper’ snails
This step is based on the same sauce as in my giz-dodo recipe – a chunky blend of tomatoes, onions and chili peppers which add texture and flavour to the snails.
To begin with, I slice (not finely) a red onion, and fry it off in a healthy amount of oil – about 4 tablespoons of canola or any vegetable oil. After a few minutes, I add the snails and allow them to ‘fry’ for 5 minutes.
My version of ‘frying’ is not at all aggressive, yielding a tender but chewy snail. I have had deep-fried snails, cooked to the point where they become ‘leather’.

After a few minutes, I add the chunky blend of 8 tomatoes, 3 small red onions and a mix of chili peppers. This should of course be done to taste. The key is to keep the mixture chunky so it cooks faster, and cooks down into a sauce that coats the snails.
My spices go in – curry powder, dried thyme, ginger and garlic powders too. And a bit of stock, or some of the cooking liquid. Exactly like the giz-dodo recipe.

I set the pot on a medium to high heat, lid off to allow the sauce reduce, and the snails absorb some of the flavours.

15, 20 minutes later, with lots of stirring and keen eyes, my snails are cooked. Oh, did I mention tasting along the way? To check for doneness. Of course!!!!
I toss in a handful of chopped green bell pepper, and take the pot off the heat. I stir this through and the snails are ready for service.

Hot, spicy, sweet and peppery. Chewy too. All textures, very much welcomed.

There are few greater pairings than white rice, which for me works as the cooling agent, as do the sweet plantains. Perfect harmony.

Truth be told, they also make a great bar snack on their own. I dare say some would add ‘with a bottle of beer’. But not me. I’m content with water. Or a coke.
On your marks;

Get set;

Go.

There you have it – a true Nigerian delicacy – snails.
The most popular breakfast recipe in Nigeria is a combination of tea and bread
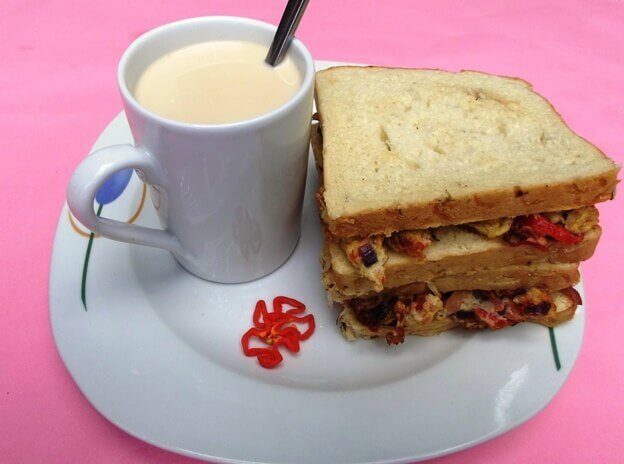 This recipe is very easy to prepare and comes in handy especially when you are in a rush to meet up with office hours. Most people in Nigerian are comfortable with just tea and bread but occasionally I fry eggs to complement the recipe.
You can follow this link to learn more about this Nigerian Breakfast Recipe. I think you will even see a video on how to fry eggs the Nigerian way.
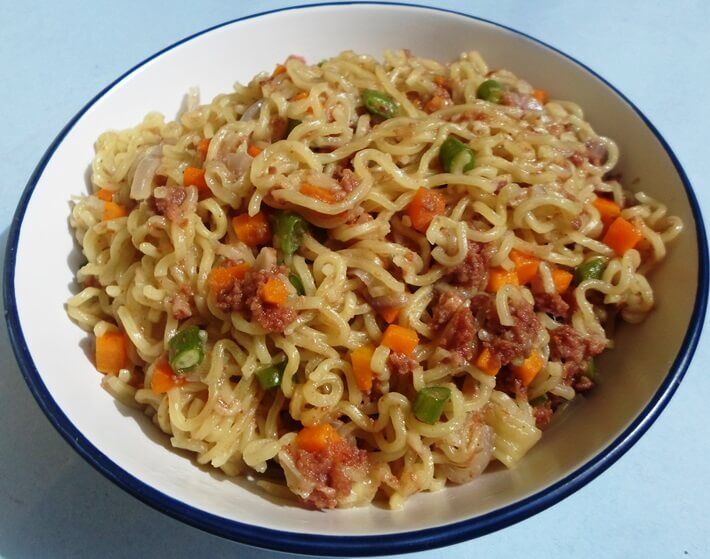
Another easy to make breakfast recipe in Nigerian is Indomie noodles. Indomie is a special kind of noodle in Nigeria that would serves as breakfast for both adults and children alike. I thought they were for kids until I discovered this particular recipe.
This recipe is very easy to prepare and comes in handy especially when you are in a rush to meet up with office hours. Most people in Nigerian are comfortable with just tea and bread but occasionally I fry eggs to complement the recipe.
You can follow this link to learn more about this Nigerian Breakfast Recipe. I think you will even see a video on how to fry eggs the Nigerian way.
Another easy to make breakfast recipe in Nigerian is Indomie noodles. Indomie is a special kind of noodle in Nigeria that would serves as breakfast for both adults and children alike. I thought they were for kids until I discovered this particular recipe.
 Learn more about Different Nigerian Noodle (indomie) recipes, you would be happy you did.
Here are some of the many different food combinations that could serve as breakfast to a Nigerian, I took the images while enjoying these meals myself likewise lots of other images you find on this site. There is likely no Nigerian food that I am yet to taste, I experiment wildly and also make lots of them in my own kitchen.
Learn more about Different Nigerian Noodle (indomie) recipes, you would be happy you did.
Here are some of the many different food combinations that could serve as breakfast to a Nigerian, I took the images while enjoying these meals myself likewise lots of other images you find on this site. There is likely no Nigerian food that I am yet to taste, I experiment wildly and also make lots of them in my own kitchen.
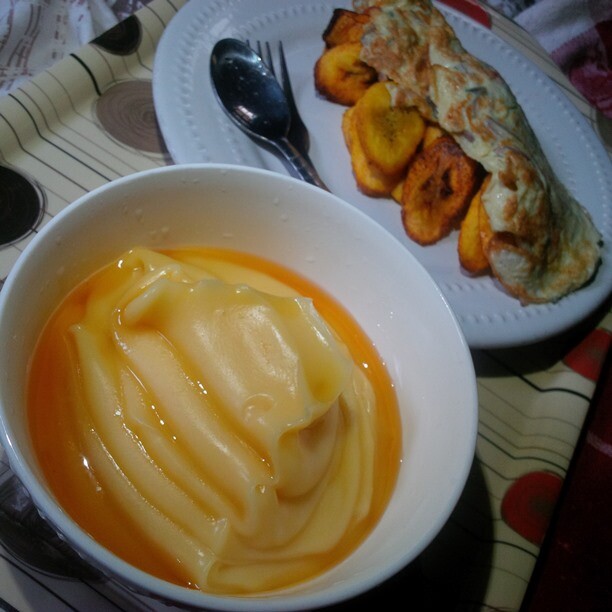 This is pap (akamu, ogi) in a plate and a combination of fried plantain and eggs.
Ogi (pap) is very simple to prepare it takes the same procedure as in making custard, you will find helpful video here on Making Akamu (pap, Ogi).
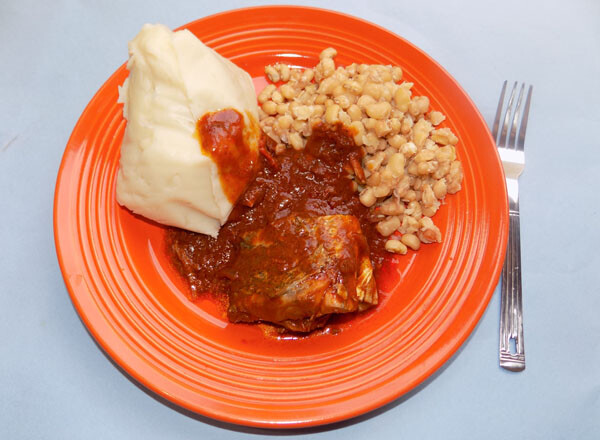
The last on my list of Nigerian breakfast recipes is beans and bread (you will know what I am saying if you live in Lagos Nigeria. The country’s most industrious state). It is called bread and ewa here in the Yorubaland and a plate is sold for less than 300 naira
 Bread and ewa are popularly made and served in local Nigerian restaurants. The making of the beans for this recipe is completely different from other beans recipes. It is just cooked beans and a special kind of stew, then the bread is often agege bread. Click here to learn more about Making bread and Beans (ewa) in Yoruba land and other beans recipes
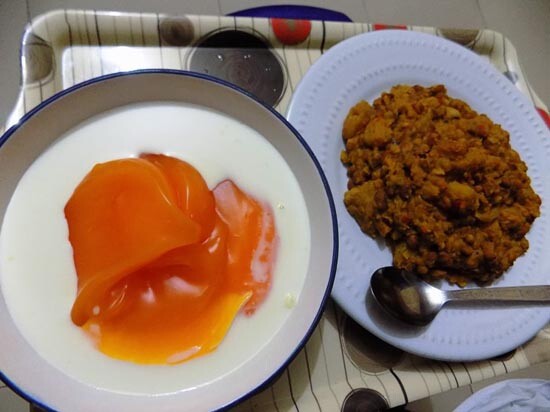
This is the image you saw on facebook today. It is a combination of porridge beans and custard. I love pap and milk. If I can’t find pap, custard does a wonderful job. This can go as either breakfast or dinner.

The picture above is that of toasted bread and coffee, it is one of the many breakfast recipe ideas in the ultimate Nigerian cookbook. Do you have a copy yet? You can Get Your Copy Here. More Nigerian breakfast ideas after the cut.
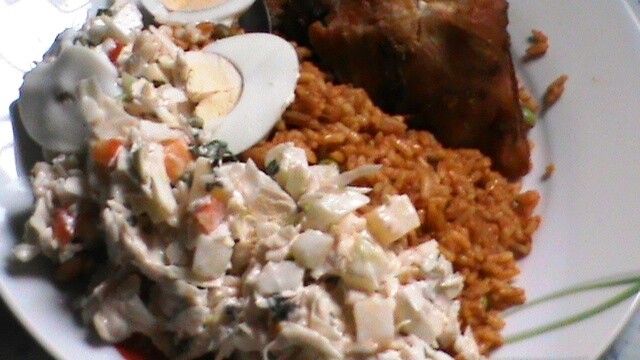
I keep thinking about my favorite breakfast recipe, a newly discovered recipe. It is just a combination of jellof rice and good amount of vegetable salads with little or no cream, I try to keep my family away from canned foods as much as I could.
These are good example of light and simple Nigerian breakfast inspiration. Although, some of them may take a while to prepare, I make things easy by stocking my fridge with every necessary ingredient and foodstuff.
Agidi or eko is called corn meal in English.
I love to serve Agidi with beans and tomato stew. In Igboland, it is often served with banga stew. I have also seen a combination of agidi and akara or moi moi. This is how I serve Agidi.
 This is not difficult at all, all you would need is just corn, chiffon cloth, bowls and lots of water. I hear you can also make agidi with store-bought corn starch but I haven’t tried that yet.
This is the age-old recipe that shows you how to make corn meal from the scratch, the same way they make the ones you buy from the street corners or mama Ugochukwu (as in my case)
Ingredients | Serving: 6
This is not difficult at all, all you would need is just corn, chiffon cloth, bowls and lots of water. I hear you can also make agidi with store-bought corn starch but I haven’t tried that yet.
This is the age-old recipe that shows you how to make corn meal from the scratch, the same way they make the ones you buy from the street corners or mama Ugochukwu (as in my case)
Ingredients | Serving: 6
8 cups of corn
Chiffon cloth
Bowls
Lots of clean water
Uma leaves
Preparation Time : 2 Hours.
Uma leaves are used for wrapping agidi or moi moi in Nigeria but you don’t need it if you are making agidi for your family. Just pour into plate and allow to cool.
The chiffon cloth is tied over the big bowl and used to separate the chaff from the starch.
You can only use the dried corn for agidi and pap. You cannot use newly harvested corn because it will not turn out right. Soak the corn in water for 24 hours.
The most popular breakfast recipe in Nigeria is a combination of tea and bread
This recipe is very easy to prepare and comes in handy especially when you are in a rush to meet up with office hours. Most people in Nigerian are comfortable with just tea and bread but occasionally I fry eggs to complement the recipe.
You can follow this link to learn more about this Nigerian Breakfast Recipe. I think you will even see a video on how to fry eggs the Nigerian way.
Another easy to make breakfast recipe in Nigerian is Indomie noodles. Indomie is a special kind of noodle in Nigeria that would serves as breakfast for both adults and children alike. I thought they were for kids until I discovered this particular recipe.
Learn more about Different Nigerian Noodle (indomie) recipes, you would be happy you did.
Here are some of the many different food combinations that could serve as breakfast to a Nigerian, I took the images while enjoying these meals myself likewise lots of other images you find on this site. There is likely no Nigerian food that I am yet to taste, I experiment wildly and also make lots of them in my own kitchen.
This is pap (akamu, ogi) in a plate and a combination of fried plantain and eggs.
Ogi (pap) is very simple to prepare it takes the same procedure as in making custard, you will find helpful video here on Making Akamu (pap, Ogi).
Ogi (pap) is very simple to prepare it takes the same procedure as in making custard, you will find helpful video here on Making Akamu (pap, Ogi).
The last on my list of Nigerian breakfast recipes is beans and bread (you will know what I am saying if you live in Lagos Nigeria. The country’s most industrious state). It is called bread and ewa here in the Yorubaland and a plate is sold for less than 300 naira
Bread and ewa are popularly made and served in local Nigerian restaurants. The making of the beans for this recipe is completely different from other beans recipes. It is just cooked beans and a special kind of stew, then the bread is often agege bread. Click here to learn more about Making bread and Beans (ewa) in Yoruba land and other beans recipes
This is the image you saw on facebook today. It is a combination of porridge beans and custard. I love pap and milk. If I can’t find pap, custard does a wonderful job. This can go as either breakfast or dinner.
The picture above is that of toasted bread and coffee, it is one of the many breakfast recipe ideas in the ultimate Nigerian cookbook. Do you have a copy yet? You can Get Your Copy Here. More Nigerian breakfast ideas after the cut.
I keep thinking about my favorite breakfast recipe, a newly discovered recipe. It is just a combination of jellof rice and good amount of vegetable salads with little or no cream, I try to keep my family away from canned foods as much as I could.
These are good example of light and simple Nigerian breakfast inspiration. Although, some of them may take a while to prepare, I make things easy by stocking my fridge with every necessary ingredient and foodstuff.
Agidi or eko is called corn meal in English.
8 cups of corn
Chiffon cloth
Bowls
Lots of clean water
Uma leaves
Preparation Time : 2 Hours.
How To Make Agidi
Wash the corn and transfer into a cooking pot, add water to cover them and set on heat. Stir occasional and turn off the heat when it is about to boil.
Drain the water and take the corn to the grinding mill, There are lots of places to grind agidi corn in Nigeria for a very little amount of money. You may not use a blender.
Grind the corn and rinse it.
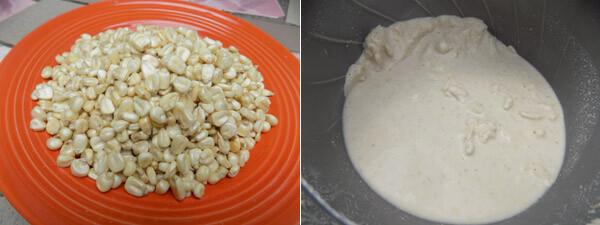 Drape the chiffon cloth over a big bowl and tie it up. Scoop in some ground corn in handful portions and tart rubbing it on the surface while adding water. At some point you will feel just the chaff. Remove it and scoop in more ground corn.
At the point when your hand can feel the water in the bowl from the top of the chiffon cloth, stop adding water and just rinse the ground corn.
Once ground corn is mixed with enough water, the starch will escape into the bowl as you keep robbing on them while the chaff is left on the surface. This should be easy.
Drape the chiffon cloth over a big bowl and tie it up. Scoop in some ground corn in handful portions and tart rubbing it on the surface while adding water. At some point you will feel just the chaff. Remove it and scoop in more ground corn.
At the point when your hand can feel the water in the bowl from the top of the chiffon cloth, stop adding water and just rinse the ground corn.
Once ground corn is mixed with enough water, the starch will escape into the bowl as you keep robbing on them while the chaff is left on the surface. This should be easy.
 Remove the chiffon cloth once you are done and allow the starch in the bowl to sit for up to 3 hours.
After three hours, the starch should have settled at the bottom of the bowl and water on top. Decant – pour out the clear water and stir what is left with a wooden turner. It should not be as thick as dissolved pap or custard and it shouldn’t be too watery either.
It should be about 2 litters (2000ml) if you used 8 cups of corn. Pour into a pot, set on heat and start stirring with a wooden turner. The heat shouldn’t be too much, if it is forming solid crumbs, then the heat is too much. Reduce it a little.
Remove the chiffon cloth once you are done and allow the starch in the bowl to sit for up to 3 hours.
After three hours, the starch should have settled at the bottom of the bowl and water on top. Decant – pour out the clear water and stir what is left with a wooden turner. It should not be as thick as dissolved pap or custard and it shouldn’t be too watery either.
It should be about 2 litters (2000ml) if you used 8 cups of corn. Pour into a pot, set on heat and start stirring with a wooden turner. The heat shouldn’t be too much, if it is forming solid crumbs, then the heat is too much. Reduce it a little.
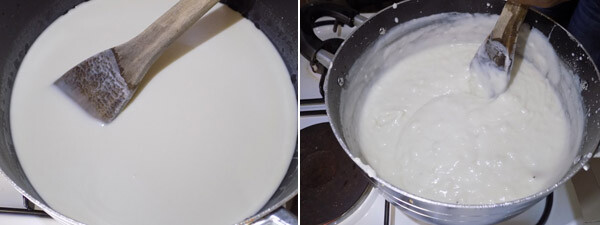
Continue stirring until it looks like prepared pap but maybe a little thicker. This should take about 15 minutes before you get to this point. Pour into smaller plates or use a leave to wrap. My video shows you how to use the leaves and gives you a visual version of how to make agidi or eko the Nigerian way.

Allow 1-3 hours for the agidi to cool and solidify. Serve with boiled beans and tomato stew. I love it that way. You can also serve with moi moi or akara.
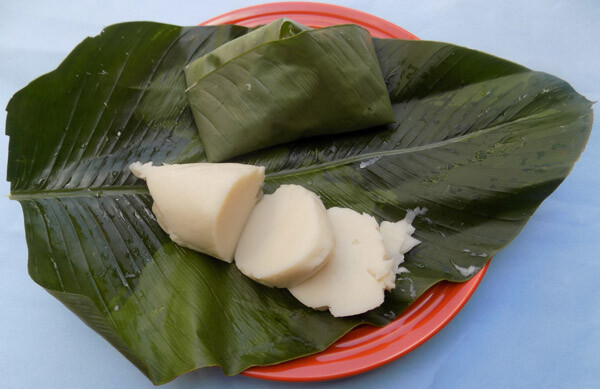 That is how to make Agidi white, the Yorubas call it eko. I would like to read your comments below. Go from Agidi to Other Foods, thanks for your time and have wonderful day ahead. Don’t forget to tell me how your agidi (eko) turned out.
Continue stirring until it looks like prepared pap but maybe a little thicker. This should take about 15 minutes before you get to this point. Pour into smaller plates or use a leave to wrap. My video shows you how to use the leaves and gives you a visual version of how to make agidi or eko the Nigerian way.
Allow 1-3 hours for the agidi to cool and solidify. Serve with boiled beans and tomato stew. I love it that way. You can also serve with moi moi or akara.
Okro Soup with Vegetables

Okro Soup with Vegetable
There are so many incredible ways to make okro Soup. From this super delicious Otong style to this quick Yoruba asepo version. The beauty of it is how diverse you can take it depending on preference, time and budget. This mixed version with vegetables is one of my personal favorites. It’s so green and so lush yet it’s super simple to make. Serve it alone or with your favorite swallow and thank me later.
Ingredients
- 1 small onion
- 1 large bell pepper (tatashe)
- 2 hot pepper
- 1 cup palm oil
- ½ cup crayfish powder
- Cooked Assorted meat and fish – I used a combination of Goat, beef, red prawns and panla
- Maggi and salt – to taste
- 6 cups chopped okro
- 6 cups meat stock or water
- 4 cups chopped greens (ugu, spinach, tete etc)
Direction
- Combine onion and peppers in a blender or food processor. Process until just coarse
- Place a large pot on medium heat. Add in palm oil. Stir in crayfish and combine with the oil.
- Add in minced peppers/onion (from step one).
- Add in meat stock and precooked meat. Stir. Taste and adjust for salt and maggi. Simmer covered for 10 minutes.
- Stir in chopped okro and cook for 2 mins. Stir in chopped green and cook for another 3 minutes. Remove from heat immediately.
- Okro vegetable soup is ready to serve. Enjoy!!!
Mixed Vegetables Curry Sauce

This is my go-to vegetable sauce. It's quick, it's easy and it's delicious! It's the perfect match for boiled white rice. Take a break from fried tomato stew and try the Mixed Vegetables Curry Sauce today.
Ingredients
The vegetables below are my favourite combination of vegetables to use but feel free to remove some of them and add your favourite vegetables. Just make sure that there's carrot in there because it gives this sauce a rich delicious taste.
- 1 carrot
- 1 onion
- 3 mushrooms
- ½ green bell pepper
- ½ red bell pepper
- 6 lumps of chicken (soft chicken)
- 1 tablespoon corn flour/starch (thickener)
- 1 teaspoon thyme
- 2 big stock cubes
- 2 teaspoons Nigerian curry powder
- Salt to taste
Notes on the ingredients
- I use the soft chicken (cockerel or rooster) for this sauce because the sauce tastes better with it.
- If you are in the USA, use corn starch. If you are in Nigeria, make sure the corn flour you use is very fine. The corn flour sold in Nigerian markets are not so fine.
- The curry powder used in this sauce is the curry powder used in Nigerian recipes NOT the hot and spicy Indian curry.
Before you cook the Mixed Vegetables Curry Sauce
- Rinse all your vegetables very well. Scrape the carrot.
- Cut the mushrooms into thin slices like this.
- Divide the onion into 2. Cut half into small pieces and cut the other half into long thin slices.
- Cut the red and green peppers into long thin slices.
- Cut the carrot into thin half moons
Cooking Directions
- Set the pieces of chicken in a pot.
- Add the stock cubes (crushed), thyme and the half of the onion that you cut into tiny pieces.
- Pour water to the same level as the contents of the pot and start cooking on high heat.
- While that is cooking, mix the corn flour/starch with a small quantity of water to get the consistency of evaporated milk. Or a little bit more watery than evaporated milk.
- When the chicken is cooked, take them off from the pot and set aside. Leave the stock (water from cooking the chicken) in the pot.
- Add the curry powder, the carrot and mushrooms
- Stir, cover and continue cooking, again on high heat.
- Once it boils, add the peppers and the other half of the onion.
- Stir and continue cooking for 90 seconds.
- Add the thickener. Stir and add the chicken.
- Stir and add salt if necessary and it's done!
You need to be careful so you don't overcook the vegetables. Serve with boiled white rice.
How to cook Banga Soup (Ofe Akwu)
 Nigerian Banga Soup or Ofe Akwu is native to the Niger Delta and the South Eastern parts of Nigeria. In the Niger Delta areas, Banga soup is commonly eaten with various fufu recipes: Starch, Pounded Yam, Semolina, Garri and Cassava Fufu. In the South Eastern parts of Nigeria, Banga Soup is referred to as Ofe Akwu where Ofe means Soup / Stew and Akwu means palm fruit and is used mainly as stew for Boiled White Rice.
The palm fruit oil extract used in cooking Banga Soup / Stew is quite different from the red palm oil used in cooking Nigerian food recipes. Palm Oil is pure oil extracted from the palm fruit pulp at high temperatures while the palm fruit oil extract used for the Banga Soup is extracted at a very low temperature and is a mixture of oil and water. Palm fruit oil extracted for Banga Soup contains less saturated fat than palm oils.
Ingredients for Banga Soup
- 1 kg Palm Fruits or 800g tinned Palm Fruit Concentrate
- Beef
- Dry Fish
- Vegetable: Scent Leaves for Ofe Akwu or dried and crushed bitterleaves for Delta-style Banga Soup
- 2 medium onions
- 2 tablespoons ground crayfish
- Salt and Chilli Pepper (to taste)
- Ogiri Okpei (Iru)
- 1-2 big stock cubes
Before you cook the Nigerian Banga Soup
- Extract the palm fruit concentrate from the palm fruits. If using the tinned palm fruit concentrate, open the tin and set aside.
- Cook the beef and the dry fish with 1 bulb of diced onion and the stock cubes till done.
- Wash and cut the scent leaves into tiny pieces. The scent leaves give the Banga Stew (Ofe Akwu) its unique aroma and taste. If you are outside Nigeria, this may be hard to find, so you can use pumpkin leaves or any other vegetable in place of scent leaves. If cooking Delta-style Banga Soup for starch, you should either cook this soup without vegetables or use dried and crushed bitter leaves.
- Cut the remaining bulb of onion. Pound the crayfish, ogiri okpei and pepper in a mortar and set aside. You can also grind them with a dry mill.
Cooking Directions
- Set the pot of palm fruit extract on the stove and start cooking at high heat. Leave to boil till you notice come red oil at the surface of the Banga Stew. If you think that the Banga Soup is watery, cook till the soup has thickened to the consistency you like for your stews.
- Now, add the beef, dry fish and stock, the onions, crayfish and pepper and leave to boil very well.
- Add the scent leaves or other vegetable and salt to taste. Leave to simmer for about 2 mins. The Banga Soup is done. Serve with White Rice or use the Delta-style Banga Soup to eat Starch, Garri, Semolina, Amala or Pounded Yam.
Cooking Directions for those using tinned palm fruit concentrate
- When the beef and fish are well done, add the palm fruit concentrate and add water to get the consistency you like for your stews. Leave to boil very well.
- Add the onions, crayfish, pepper and ogiri blend and let it boil very well.
- Add the scent leaves or other vegetable and salt to taste. Leave to simmer for about 2 mins. The Banga Soup is done.
If you used bitter leaves to prepare it, serve with Nigerian fufu meals especially Starch. If you used scent leaves to prepare it, serve with boiled white rice.
How to Season and Grill Chicken
 Chicken is used a lot when preparing Nigerian recipes, especially the Rice recipes and stew recipes. Chicken can also be eaten as a snack and washed down with a chilled drink.
Ingredients
Chicken is used a lot when preparing Nigerian recipes, especially the Rice recipes and stew recipes. Chicken can also be eaten as a snack and washed down with a chilled drink.
Ingredients
You want to season your chicken so that it will be very tasty and you also want to prepare it such that it will be presentable and appetizing.
Seasoning chicken is very easy and you only need a few ingredients. Most often, people think that you have to add all the spices and stock cubes in the world to make the chicken tasty. But what all these excess seasoning does to the chicken is to take away the natural flavour of the chicken. To season chicken, you only need these major spices and ingredients:
- Chicken: Hen (female chicken) is tougher and tastier than cockerel (male chicken) so when you go to buy chicken, ask your grocer or meat seller for the hen. This is called Gallina in Spanish. You should also buy a whole chicken and cut it up in pieces. Not only is it cheaper but you get the different parts of the chicken which adds to the flavour rather than just one part.
- Onions: White, yellow or red onions. Onions are very important when seasoning chicken.
- Thyme: This is very essential due to the aroma it adds to the chicken.
- Stock cubes: Maggi or Knorr are the brands that bring out the best taste in Nigerian recipes.
- Salt: Use salt sparingly when seasoning your chicken. Salt should be added when the chicken is done. Never add salt to raw chicken, see notes below for more information on what adding salt too early does to your chicken or beef.
You should also grill your chicken after cooking it rather than deep-fry it. If you have an oven, please grill your chicken because it is healthier. Grilling also makes the chicken taste better
Directions for Seasoning and Grilling Chicken
- Cut up the whole chicken to desired pieces. Most grocers or meat sellers will do this for you and save you the job.
- Put the chicken pieces in a pot; add diced onions, thyme and stock cubes.
- Pour enough water to just cover the contents of the pot and start cooking.
- Since the hen is tough, it takes quite some time to get it well cooked. It usually takes me one hour 15 minutes on medium heat with a normal cooking pot to get it done to the way I like it. Depending on the heating capacity of your cooker, this may take less. Also if you use a pressure cooker, it will take even much less time so keep an eye on it so that it does not get too soft.
- When the chicken is done, add some salt, cover the pot and leave to simmer for about 2 minutes. Adding salt at the beginning will make your chicken cook in more time because salt toughens the chicken and some other food stuff.
- Transfer the chicken to a sieve to drain.
- Then place them on your oven rack, place the rack as close to the grill (the top heater in your oven) as possible.
- Switch your oven to "Grill" or if you are in the USA, "Broil" and set the temperature to 170°C or 338°F.
- When the top side becomes brown, turn the pieces of chicken on the other side.
- The chicken is well-grilled when both sides are brown.
Notes about cooking the chicken:
- Add water up to the level of the contents of the pot when cooking the chicken.
- When cooking chicken, I do not add salt to the raw chicken. This is because salt closes the pores of the chicken (and infact anything you are cooking), this prevents the natural flavour of the chicken from coming out into the surrounding water and prevents the seasoning from entering the chicken to improve the taste. The result is that your chicken stock will not have a rich natural taste. It will only have an artifical taste of seasoning.
Salt also hardens the chicken hence it takes longer to cook.
I only add salt when the chicken is done. A lot of people think that adding salt early makes the chicken taste better but there's a big difference between a salty taste and a rich taste. I believe that what gives food a rich taste is not salt but the natural flavour of the food so allow this natural flavour to come out into your stock by NOT adding salt too early. And remember, stock cubes already contain salt so you really don't need more salt.
- I do not use Nigerian curry powder to season my chicken simply because it changes the colour of the chicken and gives it an artificial overpowering taste. You can add curry powder to stews that you use the chicken or beef for. But if you don't mind the colour and taste it gives the chicken, feel free to add it when steaming the beef or chicken.
Serve with all the Nigerian Rice recipes, Nigerian Moi Moi and Nigerian Salad. Feel free to snack on it with a chilled drink. Your guests will love you if you serve them grilled chicken.
Salt also hardens the chicken hence it takes longer to cook.
I only add salt when the chicken is done. A lot of people think that adding salt early makes the chicken taste better but there's a big difference between a salty taste and a rich taste. I believe that what gives food a rich taste is not salt but the natural flavour of the food so allow this natural flavour to come out into your stock by NOT adding salt too early. And remember, stock cubes already contain salt so you really don't need more salt.
Nkwobi: Spicy Cow Foot
 Nkwobi is a Nigerian delicacy that is usually ordered and enjoyed in exclusive restaurants.
It is simply cooked cow foot mixed in spicy palm oil paste. Nkwobi is often mistaken for Isi Ewu but they are not the same.
Nkwobi is a Nigerian delicacy that is usually ordered and enjoyed in exclusive restaurants.
It is simply cooked cow foot mixed in spicy palm oil paste. Nkwobi is often mistaken for Isi Ewu but they are not the same.
Ingredients for Nkwobi
- 2kg (4.4 lbs) cow foot (cut into sizeable pieces)
- 20cl (200ml) Palm Oil
- 1 tablespoon powdered edible potash (Akanwu/Kaun/Keun)
- 1 teaspoon ground Ehu seeds (Calabash Nutmeg)
- 2 tablespoons ground crayfish
- 2 habanero peppers (or to your taste)
- 1 medium onion
- 2 big stock cubes
- Salt (to taste)
To garnish
- 1 medium onion
- 10 Utazi leaves (Gongronema latifolium)
Notes on the ingredients
- The 2kg of cow foot may sound like a lot but remember that cow foot is mostly bones so 2 people that love Nkwobi can finish that in no time.
- Cow foot is quite tough so if you have a pressure cooker, do use it for cooking it to save time and gas/electricity. You may be able to buy calf foot which is softer and cooks in less time.
- Ehu (Calabash Nutmeg) is a very traditional ingredient that is difficult to find outide Nigeria. If you can't buy it where you live, just prepare the Nkwobi without it. Ordinary nutmeg is not an alternative to this because they are not similar in any way. If you have friends or family in Nigeria, they will be able to buy ehu seeds and send to you, a small quantity goes a long way.
- Potash is what makes the palm oil curdle as you will see in the video below. An alternative I know is what we call Ngu in Igbo. Ngu is even more traditional than potash so if you can't find potash, chances are that you won't be able to get Ngu either.
- Utazi adds a nice bitter flavour to the Nkwobi. if you can't buy it where you live, use spinach (bold ones), it gives the same effect and actually tastes nice! In fact that's what I used in the video below.
Before you make the Nkwobi
- Cut the cow foot into medium chunks. Where I live, the butchers cut it for me.
- Put the powdered potash into a bowl. Add a small quantity of water (about 4 table spoons) and stir well.
- Pass it through a fine sieve and set the liquid aside.
- Cut 1 onion into 4 big chunks.
- Pound the pepper with a mortar and pestle or blitz it.
- Grind the crayfish.
- Crack and remove the outer shell of the ehu then grind with a dry mill eg coffee grinder.
Directions for making Nkwobi
- Wash and put the cow foot chunks in a pot.
- Add the stock cubes (crushed) and the chunks of onion.
- Add a small quantity of water and start cooking at medium heat till well cooked. Add just enough water to prevent burning as you cook. There should not be any stock (water) in the pot when the meat is done.
- While the meat is cooking, pour the palm oil into a clean dry pot.
- Pour in the potash mixture (sieved) into the oil.
- Stir with a wooden spatula as you pour the potash. You'll notice the palm oil begin to curdle and turn yellow.
- Keep stirring till all the oil has turned yellow.
- Add the ground crayfish, pepper and ehu seeds. Stir very well till they are all incorporated.
- When the meat is done, add salt, stir and cook till all the water has dried.
- Add the well done cow foot to the palm oil paste and stir very well with the wooden spatula.
- Put it back on the stove/cooker and heat till the Nkwobi is piping hot, stirring all the time to make sure it does not burn.
- To prepare the garnish, cut the onions into rings and cut the utazi into long thin slices.
- Serve the Nkwobi in a wooden mortar as shown in the image above.
- Add the thin slices of utazi and onion rings on top for the full effects.
If you have any questions about this recipe, click here to ask me.
Best served with chilled drinks: palm wine, beer or stout and soft drinks.
Ofe Achara with Akpuruakpu Egusi (Mgbam)

Ofe Achara with Akpuruakpu Egusi (Mgbam) is the most traditional way to prepare Egusi Soup. The akpuruakpu is molded egusi. This is not just ordinary molded egusi that scatters as you cook the soup. These disc shaped molds of egusi should be intact and solid by the time the soup is done such that the person enjoying the soup can bite into and chew them like meat.
Akpuruakpu and mgbam are dialects from Imo and Abia states of Nigeria. In my state (Anambra), we call it Egusi Ógbalóti. Yes, only correct Anambra boys and girls know it by this name. LOL
Other ways of cooking Egusi Soup:
- Egusi Soup (Caking Method): I also call this one the Egusi Before Oil method. No frying is involved, making is a healthier way to prepare Egusi Soup.
- Fried Egusi Soup: where the Egusi is fried in palm oil before other ingredients are added. I also call this one the Oil Before Egusi Method.
Ingredients for Ofe Achara
For a decent pot of soup, you will need:
- 300g egusi (melon) seeds
- 40g ósú
- 1 handful sliced okazi leaves
- 1 cup broken pieces of achara (~15 stalks of achara)
- 2 cooking spoons red palm oil
- 3 pieces stock fish
- 1 dry cat fish
- 1 ogiri okpei
- 3 small stock cubes
- Habanero pepper (atarodo, ose oyibo, atarugu)
- 1 handful crayfish
- ½ teaspoon dry pepper
- Salt (to taste)
Important tool
- Spice grinder for grinding egusi (melon) seeds, crayfish, Ósú and ogiri okpei:
Buy it in USA | in UK (Krups Twin Blade Grinder)
Buy it in USA | in UK (Krups Twin Blade Grinder)
Notes on the ingredients and alternatives:
- Since most of the ingredients listed above come in different sizes, it is advisable to watch the video below to see the sizes of the ingredients I used.
- I used only stockfish and dry fish in preparing this soup, no meat. But you can add meat if you want.
- What is Achara?
- Achara is elephant grass (Pennisetum purpureum). The word achara is Igbo language and this one word means elephant grass, bamboo and sugar cane (also okpete in Igbo) but as far as this recipe is concerned, achara is elephant grass.
- I asked on Facebook for other names for achara in other languages and I got: Achala (a variant spelling in Igbo), Ireke / Ireke Obo (Yoruba), Takanda/Kara (Hausa), Kangale saudu (Kanuri), Asara (Ibibio), Mbritem (Akwa Ibom). I have asked for confirmations from the contributors to make sure some of these names do not translate to sugar cane because the achara used in Ofe Achara is not sugar cane. I will update these names as I get more feedback.
- Achara is NOT: sugar cane, lemon grass nor spring/wild onions.
- Ogiri okpei is made with locust beans. It is known as iru in Yoruba. It adds a traditional taste to Nigerian soups that it goes well with such as Egusi Soup and Ogbono Soup. If you do not have it, use only crayfish.
- Some people add achi or ófó (both are Egusi Soup thickeners) to this soup. You can achieve a similar effect using ósú. See video below.
- Ósú is a binder for the molded egusi. It helps hold the balls together so that no matter how you stir the soup, the egusi balls will not disintegrate. Ósú is a naturally occuring parasitic plant that grows on trees. I do not know any other names for it.
- If you can't buy achara where you live and you are dying to re-live the taste of Ofe Achara or try it, use asparagus as alternative. For now, that's the closest alternative that I know. The texture of Asparagus is similar to the edible inner tender shoots of achara and both taste almost the same; that mild almost bland taste. And when you cut up asparagus like I did the achara, you can pretend that you are eating achara, just call it Asparegusi Soup and not Ofe Achara. LOL
- Okazi is afang leaf (Gnetum africanum).
Before you cook Ofe Achara
- Achara is elephant grass (Pennisetum purpureum). The word achara is Igbo language and this one word means elephant grass, bamboo and sugar cane (also okpete in Igbo) but as far as this recipe is concerned, achara is elephant grass.
- I asked on Facebook for other names for achara in other languages and I got: Achala (a variant spelling in Igbo), Ireke / Ireke Obo (Yoruba), Takanda/Kara (Hausa), Kangale saudu (Kanuri), Asara (Ibibio), Mbritem (Akwa Ibom). I have asked for confirmations from the contributors to make sure some of these names do not translate to sugar cane because the achara used in Ofe Achara is not sugar cane. I will update these names as I get more feedback.
- Achara is NOT: sugar cane, lemon grass nor spring/wild onions.
- Soak the stockfish and dry fish with cool or lukewarm water to soften. When soft, clean thoroughly and debone.
- Grind the egusi seeds and the ósú with a dry mill.
- Grind the crayfish with the ogiri okpei, also with a dry mill or spice grinder.
- Peel the achara by removing the coarse outer husk till you get to the tender part. Then break the tender part into 1 cm long pieces. Any part of the shoot that is not brittle (easily breakable), should be discarded. Rinse the pieces of achara and set aside.
- Pound the habanero pepper with a mortar or grind with a hand blender.
Cooking Directions
- Cook the stockfish with the stock cubes (seasoning cubes) till soft and pour some of the stock into a bowl. Yes, this has been soaked earlier but stockfish is quite tough and soaking alone does not get it as soft as we need it. The soaking is necessary so that it can be cleaned very well.
- Pour most of the ground egusi (about 70%) into a clean dry bowl.
- Season the egusi with dry pepper and some of the crayfish and ogiri okpei blend. It's important to season the egusi very well so that the mgbam will not taste bland when one bites into it.
- Add some of the fish stock to the egusi and mix till a thick dough is formed.
- Mold the egusi dough into flat discs, as big as a coin and set aside.
- Boil some water and throw the molded egusi into the pot of boiling water. Cook for 10 minutes on medium heat.
- Set the pot of stockfish on the stove. It should still contain some stock from cooking the stockfish. If not, add the water from boiling the egusi balls.
- Add the deboned dry fish, habanero pepper and the remaining crayfish and ogiri okpei blend and bring to a boil.
- Once it boils, take off the fish and set aside.
- Add the remaining ground egusi to the stock, stir and cook till you see some clear egusi oil come to the surface. This should take 15 to 20 minutes. Stir the soup often so it does not burn. Add the water you used in boiling the molded egusi when necessary.
- Once you are sure you see some clear oil at the top, add palm oil and cook for 5 minutes.
- Add the boiled akpuruakpu egusi, achara, okazi and the fish we took out earlier.
- Add salt to your taste, cover and once it boils again, it is done!
Kankaran Tsamiya (Frozen Tamarind Juice)


Kankaran Tsamiya is frozen extract from the tsamiya (tamarind) fruit. This is a Northern Nigerian licky-licky enjoyment! LOL
Tamarind (second image above) has a sweet and sour taste. It is in the same family as Velvet Tamarind which is more popular.
Ingredients for Kankaran Tsamiya
You only need 2 ingredients. The quantity of water you need for a given quantity of tamarinds depends on how concentrated you want your Kankaran Tsamiya.
- Tamarind (tsamiya)
- Lukewarm water
You will also need:
- A container for freezing them. You can also use transparent plastic bags.
- A fine sieve
- A freezer
Directions
- Peel and soak the tamarinds in lukewarm water.
- When soft, mash them up or rub in a sieve till you get a smooth puree. Watch the video below to see me extract the juice from the tamarind fruit (process starts at time 1:00). For best extraction, I remove the seeds from the tamarind before soaking them.
- Pour the mashed mixture through a fine sieve.
- Pour the extract into containers and place in the freezer overnight. For the ones in the image above, I used heart shaped ice cube tray. I placed toothpicks in the cups of the ice cube tray before freezing.
- When completely frozen, remove from the ice cube trays and lick immediately. That's it!
Lick like ice lollies on a hot day!
How to Prepare Ukwa (African Breadfruit Porridge)


African breadfruit is in a food class of its own. I was not sure where to put it but finally settled for beans section because breadfruit seeds are most similar to beans. It is known as Ukwa in Igbo and the scientific name is Treculia africana.
Ukwa is such a versatile food with a natural delicious flavour. It can be cooked plain without any ingredient, not even salt and it will taste great especially when prepared with fresh Ukwa. It can be roasted and eaten with coconut or palm kernel. It can also be prepared as a porridge which is what this page is about.
Ingredients
- 700g African Breadfruit
- 2 medium dry fish
- 2 small stock cubes
- 7g edible potash
- Palm oil (enough to colour)
- 5-6 fresh bitter leaves
- Pepper & Salt (to taste)
Common additions to Breadfruit Porridge:
- White Puna yam
- Corn/Maize, you can also use sweet corn
Notes on the ingredients
- Freshly peeled ukwa or dried ukwa can be used for this recipe.
- You can use stock fish instead of dry fish or both.
- By fresh bitter leaves I mean bitter leaves that have NOT been washed and squeezed.
- Always add enough palm oil to make your Nigerian meals look appetizing.
- Edible potash acts as food tenderizer. Only a very small quantity should be used. If you are lucky to buy freshly dehusked ukwa seeds from the same tree, you will not need to use the food tenderiser. I do not know any alternative to edible potash.
Before you cook the Ukwa
- If using dry ukwa, soak it overnight in plenty of cold water. If using fresh ukwa, skip this step.
- The next day, soak, debone and wash the dry fish or stock fish and break into pieces.
- Wash the ukwa thoroughly in cold water. Stones and sand usually settle at the bottom so watch out for those.
- Pound the pepper.
- Rinse the bitter leaves and set aside.
Cooking Directions
- Put the thoroughly washed ukwa in a sizeable pot. I used a pressure pot in the video below because it cooks the ukwa much faster.
- Pour enough water to cover the ukwa. The level of water should be about 1 inch above the level of the ukwa.
- Add the edible potash. Add the dry fish or stock fish, cover the pot and cook till well done. The ukwa is done when the seeds melt when pressed. You may need to top up the water while cooking so watch it closely. If using a pressure pot, top ups will not be necessary.
- Add enough palm oil to the well done ukwa, add pepper, stock cubes and salt to taste.
- Stir. Cover and cook on medium heat till the palm oil changes colour from red to yellow. This should take about 5 minutes.
- Stir and add the bitter leaves.
- Cover and leave to simmer or till the leaves wilt but still green and the ukwa is ready to be served.
Cooking Ukwa with a Pressure Pot
If you have a pressure pot, ukwa is one of the Nigerian recipes that you should use it for because it cuts the cooking time by a lot.
- For pressure pots, follow the directions above up till Step 2.
- Then for step 3, add edible potash, dry fish or stock fish, pepper, salt to taste, stock cubes and palm oil.
- Cover, pressurize and cook for 30 minutes. I set the pressure on my pot to 1 and my cooker to heat 7 (my burner's heat settings range from 1-9).
- After 30 minutes with the above settings, the ukwa should be well done. Depressurize the pot under running water and add the bitter leaves.
- Cover and cook till the vegetables wilt but are still green. There is no need to pressurize the pot during this step.
- Stir and it's done!
Note: Breadfruit Porridge gets thicker as it cools down so ensure you have enough porridge in the meal when done.
Serve with chilled palm wine, palmy. Awww! Or any other chilled drink.
Lentils Porridge

 Lentils are super legumes. Due to their high fiber content, they prevent sugar levels from rapidly rising after a meal. They also help lower cholesterol. So everyone should be eating lentils not just diabetics.
In this recipe, I show how I cook lentils such that it tastes Nigerian.
Lentils are super legumes. Due to their high fiber content, they prevent sugar levels from rapidly rising after a meal. They also help lower cholesterol. So everyone should be eating lentils not just diabetics.
In this recipe, I show how I cook lentils such that it tastes Nigerian.
Ingredients
- 600g lentils
- 1 cooking spoon red palm oil
- 1 small green pepper
- 2 carrots
- 2 red onion
- Black pepper (to taste)
- 1 big stock cube
- Salt (to taste)
Notes on the ingredients
- Lentils are known as lentils wherever they are available in Nigeria. Look for them in big supermarkets.
- The quantities of green pepper, carrots and red onions can be adjusted to your taste and how busy or sparse you want these ingredients to appear in the meal.
Before you cook Lentils Porridge
- Rinse the lentils in plenty of cool water.
- Rinse and dice the green pepper and onions.
- Scrape, rinse and dice the carrots.
Cooking Directions
- Put the lentils in a pot, pour a generous quantity of water because lentils can absorb lots of water.
- Add the stock cube, black pepper and start cooking.
Note: If you have a pressure cooker, use it to cook lentils because because they take a while to cook with a normal pot.
- When the lentils are very soft, add the onions, carrots, palm oil and salt ans continue cooking.
- When it heats up, add the green peppers. Cover and let it heat up again.
- Once it heats up again, stir and serve when it has cooled down to a comfortable temperature.
Aim to have the lentils poridge a bit watery because when it cools down to a confortable temperature, it becomes thicker.
Note: If you have a pressure cooker, use it to cook lentils because because they take a while to cook with a normal pot.
Nigerian Shuku Shuku (Coconut Balls)

Nigerian Shuku Shuku is a great Nigerian delicacy that doubles as a dessert and a snack. It is one of the easiest Nigerian recipes on this website.
If you have ever tasted coconut and bread (chewed together), that's what Shuku Shuku tastes like. It is the perfect way to recycle the chaff that I get when I extract coconut milk. You can also use coconut flakes for this but the Shuku Shuku made with those are lighter.
Ingredients for Shuku Shuku
I prepare Shuku Shuku in 2 ways. The first one (shown on the right in the image above) requires baking while the second does not.
For the baked method you will need:
- 120g coconut chaff (or coconut flakes)
- 3 egg yolks
- 30g icing sugar (powdered sugar)
- Bread crumbs
For the low carb version use:
- 120g coconut chaff (or coconut flakes)
- 3 egg yolks
- 2 drops stevia or to taste
For the no-bake method you will need:
- 120g coconut chaff (or coconut flakes)
- Evaporated milk (Peak Milk)
- 30g icing sugar (powdered sugar)
- Bread crumbs
For the low carb version use:
- 120g coconut chaff (or coconut flakes)
- 1 tablespoon mayonnaise
- 2 drops stevia or to taste
Notes on the ingredients:
- I prefer coconut chaff for Shuku Shuku because coconut flakes are too light and dry. You get coconut chaff from blending coconuts when making coconut milk and coconut oil.
- You only need enough quantity of evaporated milk that will make the coconut chaff stick together. So just keep adding bit by bit till the chaff is sticky enough to make balls, it should not be soaking wet.
- You can also use condensed milk. I do not use it because it is too sweet for me and it is kind of sticky.
Directions
Baked Shuku Shuku
- Put the coconut chaff in a deep bowl and add the egg yolks and the icing (powdered) sugar.
- Mix very well with a spatula till everything is well incorporated.
- Use fingertips to make small balls of Shuku Shuku, about the size of table tennis balls.
- Gently roll each ball on some bread crumbs till it is completely covered with bread crumbs.
- Place in the oven tray and bake in a preheated oven at 170°C (335°F) for 15-20 minutes. Or till you see them turn a slight yellow all over.
- That's it!
No-bake Shuku Shuku
- Put the coconut chaff in a deep bowl and add the icing (powdered) sugar.
- Add the evaporated milk (or condensed milk) bit by bit and mix with a fork at the same time.
- Do this till you have enough quantity of milk in the coconut chaff to enable you make shuku shuku balls with the chaff. The mix should not be soaking wet with the milk. :)
- Mix very well with the fork till everything is well incorporated.
- Use your finger tips to make small balls of Shuku Shuku, about the size of table tennis balls.
- Gently roll them on some bread crumbs till they are completely covered.
- They are ready to eat!
Meatball Stew

Meatball Stew is an easy twist to the classic red stew that uses juicy meat balls instead of the lumps of meat we normally use in our stews.
Meatball stew like Corned Beef Stew is commonly used to eat boiled white rice, boiled pasta (spaghetti, macaroni), boiled yam and boiled potatoes. You can even add big chunks of carrots and potatoes into the stew to make a meal you can eat on its own.
Ingredients for Meatball Stew
- 500g minced beef (ground beef)
- 3 cooking spoons conc. Tomato Stew
- 4 cloves of garlic
- 2 teaspoons thyme
- 2 teaspoons ground black pepper
- Salt (to taste)
- 3 small stock cubes
- Meat stock (optional)
- A few curry leaves (optional)
Notes on the ingredients
- Tomato Stew is fresh tomato puree and tinned tomato paste that has been boiled and fried to remove all traces of water and the sour/tangy taste of tomatoes. Please note that this stew does not contain spices or seasoning. It only contains tomato puree, then onions and vegetable oil that was used in frying it. I cannot stop talking about how always having tomato stew in my freezer saves me lots of cooking time.
- In Nigeria, we have a vegetable known as curry leaf. A close alternative is fresh basil. Add curry leaves if you want to add some vegetables to your Meatball Stew. Since curry leaves are very tiny vegetables, no need to slice them before adding to your Meatball Stew. Just pick from the stalk and add to the stew when you are ready to take it off the stove as detailed below. Since basil leaves are broader, you may need to slice those ones into small pieces before adding.
- If using the big stock cubes, use one and half.
- If you do not have meat stock on the day you prepare this, just add water. Meat stock is the water you get from cooking meat.
- For the best taste, use a mixture of minced beef and minced pork in equal amounts, that is if you eat pork. If not, buy the juiciest part of beef.
- In Nigeria, you can buy minced meat in foreign supermarkets such as Spar and Shoprite.
Before you cook Meatball Stew
- If you already have Tomato Stew in your freezer, bring it out to defrost in good time before you need to use it in the recipe. If not, prepare some Tomato Stew by following the steps at: How to Prepare Tomato Stew. Remember to pour out the excess oil when done.
I usually prepare large quantities of tomato stew and store in my freezer. That way, I can prepare such recipes as Meatball Stew in no time. All I need to do is bring out the stew early enough to defrost and food is ready before you can say meat balls lol.
- Peel and pound the garlic in a mortar. You can also use a garlic press.
- Pick the curry leaves from the stalks and rinse well if you will be using it.
I usually prepare large quantities of tomato stew and store in my freezer. That way, I can prepare such recipes as Meatball Stew in no time. All I need to do is bring out the stew early enough to defrost and food is ready before you can say meat balls lol.
Cooking Directions
- Put the minced meat in a bowl.
- Add crushed garlic, 1 teaspoon of thyme, 1 teaspoon of ground black pepper and 2 small stock cubes (crushed) to the minced meat. If using big stock cubes, add 1 at this time.
- Mix well with your hand till everything is well incorporated.
- Set your oven to 200°C (400F) to preheat.image: http://www.allnigerianrecipes.com/images/rawmeatballs.jpg

- Mold the minced meat into small balls, a bit bigger than table tennis balls. When molding, do not press too hard so that the meat balls will not be rock solid when done. Just use your finger tips to gently form the balls. I usually get 10 meatballs from 500g of minced beef. Click the raw meat balls image to enlarge.
- Place the meatballs in an oven tray and bake in the preheated oven for a total of 20 minutes. While baking, turn the meat balls around at least once so that they will cook evenly. You can also shallow fry them but I don't like doing that because for me, the meat balls are not evenly cooked when fried. Fry if you do not have an oven. This is what the meat balls should look like when done. Click the image to enlarge.image: http://www.allnigerianrecipes.com/images/cookedmeatballs.jpg

- Set a pot on the stove and add the conc. Tomato Stew.
- Add the meat stock. The consistency of the tomato stew should be medium. If you do not have meat stock, just add water.
- Add the remaining thyme, ground black pepper and stock cubes. Then add salt to taste.
- Stir very well and gently add the baked meat balls one by one into the stew.
- Cover and leave to simmer on LOW heat so that the stew will slowly come to a boil.
- Once it heats up very well, the Meatball Stew is done! If you are using curry leaves or fresh basil, add them at this time, stir and take the stew off the stove.
Serve with the following staple food of your choice: Pasta, White Rice, Boiled Yam, any pasta (spaghetti etc) and Boiled Potatoes.
White Moi Moi (Ekuru) and Stew

White Moi Moi (Ekuru) is another way to enjoy beans. With a little alteration, it is suitable for vegetarians.
White Moi Moi (Ekuru) is to regular Moi Moi what Agidi is to Agidi Jollof or what Boiled White Rice is to Jollof Rice.
It is prepared the same way as regular Moi Moi but with less added ingredients. It gets most of its taste and colour from the stew it is served with.
On its own, White Moi Moi is tasty due to the seasoning it contains so you can skip the stew and enjoy it with a chilled drink.
Ingredients
For 4 medium wraps of White Moi Moi, you will need:
For the White Moi Moi
- 360g black eyed or brown beans
- 1 small onion
- 1 big stock cube
- Salt (to taste)
- 600mls lukewarm water
- 2 cooking spoons vegetable oil (optional)
For the stew
- 250mls Tomato Stew
- 2 small smoked mackerels
- 1 small onion
- 1 small stock cube
- Salt and Habanero pepper (to taste)
- 1 teaspoon nutmeg
White Moi Moi Containers
- Aluminium foil or
- Plastic Bowls or
- Uma Leaves (Thaumatococcus Daniellii)
Tools
- Blender
- Spatula
- Bowls
Note about the ingredients
- The job of the vegetable oil is to help the Moi Moi come out of the container easily when done.
Before you cook White Moi Moi
- About three hours before cooking the moi moi, soak and peel the beans.
- When done with step 1, put the peeled beans in a bowl and pour enough water to cover it. Leave to soak for three hours. This is so that the best consistency will be achieved when you blend the beans.
- Prepare Tomato Stew if you do not have some.
- Prepare the moi moi containers.
- Prepare some Smoked Fish and break into big chunks.
- Pound/grind the pepper.
- Cut the onions into small pieces.
- Crush the stock cubes.
Cooking Directions: The White Moi Moi
- Blend the beans with the onions and crushed stock cubes and pour into a big enough bowl. Please note that the total quantity of water to be used (for blending and mixing) should be 600 mls.
- Add the vegetable oil (if using it) and stir.
- Slowly add the remaining water and stir the mixture at the same time till you get a good mix of all the ingredients.
- Add salt to taste and stir very well.
- Set some water in a pot to boil. The water should be about 1 cm deep.
- When the water boils, add some padding that will be a base for the Moi Moi wraps.
- Scoop the Moi Moi mix into your container of choice and gently place in the pot of boiling water.
- Repeat step 7 for the rest of the Moi Moi mix.
- When done, cover the wraps with some leaves or a plastic bag to keep the heat in.
- Cover the pot and start cooking on medium heat.
- Check it from time to time and add small quantities of water at a time when necessary.
- The length of time you will cook your Moi Moi depends on the quantity and the Moi Moi container you used.
The Moi Moi that gets done quickest is the one wrapped in Uma or Banana leaves, followed by Moi Moi wrapped in aluminum foils then the one that takes the most time is Moi Moi cooked in aluminium or plastic plates.
But whatever Moi Moi container you use, it is advisable to cook your Moi Moi for at least 1 hour, before checking it. Confirm that it is done by putting a knife through it, if the knife is stained with Moi Moi paste, then the Moi Moi is not done, but if the knife just has a slight smear of Moi Moi, then it's done. Also, when you cut through the Moi Moi, the insides will be set and not watery.
If you are cooking a few wraps of Moi Moi in a small pot on high heat, then it will only take about 45 minutes to get done while when you are cooking a large pot of Moi Moi, it will definitely take more than one hour.
Cooking Directions: The Stew
You can eat white Moi Moi with any tomato based stew, make sure the stew is seasoned with at least one traditional ingredient: smoked fish, iru, crayfish. This is how I prepare mine and it is so delicious, goes really well with the beans.
- Put the chunks of fish in a clean pot.
- Add the onions, some water, stock cube, pepper and nutmeg. Stir and start cooking.
- Once it boils, add the tomato stew.
- Cover and leave to simmer and it's done!
Serve with the stew or skip the stew and serve the White Moi Moi with a chilled soft drink.
How to Make Nigerian Cake

Nigerian cake is simple and sweet. There's not a lot going on in the cake but it tastes delicious. No chocolates, no whipped cream but Nigerians love it and they are always searching for that unadulterated Nigerian Cake recipe for that cake that melts in the mouth.
Nigerian Cake Ingredients
The quantities of ingredients listed below are what I used for a cake that I baked with a 10 inch diameter and 2.5 inch deep cake pan. When done, the cake had a diameter of 10 inches (of course) and a height of 2.5 inches with a slight dome.
- 500g/1.1 lbs. Plain Flour
- 12 Medium Eggs
- 500g/1.1 lbs. Butter (NOT Margarine)
- 400g/0.88 lbs. Granulated Sugar
- 3 teaspoons of Baking Powder
- 3 tablespoons of Vanilla Extract
- Half cup of Brandy
Tools You'll Need to Bake a Nigerian Cake
The following are the minimal tools you'll need to bake a Nigerian Cake:
More information about the Nigerian Cake Ingredients
The flour to use for your Nigerian Cake
You MUST use plain flour for you to have success with the Nigerian Cake recipe detailed on this page. I do not know what using a self-rising flour will do to your cake if you use it. The problem with self-rising flour is that they never state the amount of the leavening agent (in this case, baking powder) they added to the flour. This is why I prefer plain flour so that I have more control over the amount of baking powder that I add to the cake recipe.
The butter to use for you Nigerian Cake
For those living in Nigeria, please use baking butter NOT margarine. You should be able to buy baking butter from any shop that sells bakery ingredients. For my US audience whose butter comes in sticks. I don't know the weight of 1 stick of butter. Maybe this is written on the wrapping so you can check it and then know how many sticks correspond to 1.1 lbs.
Please do not melt the butter. Bring it out from the fridge the day before you make your Nigerian cake. This way, it will be soft enough for creaming on the day you'll bake the cake.
Sugar
If you think your granulated sugar is too coarse, you can grind it with a dry mill (the one used for grinding egusi, ogbono, etc) before adding it to the butter for creaming. You only need to grind it a little bit to reduce the size of the grains of sugar. This reduces the creaming time.
Flavour
The job of the vanilla extract is just to add a vanilla flavour to the cake. If you want another flavour such as butterscotch (used in wedding cakes) etc, please use it to replace the vanilla flavour and add it when I add the vanilla flavour.
Dry Fruits
If you want to add dry fruits such as raisins, please soak these in brandy for at least 1 week (up to 1 month for Nigerian wedding cakes) before adding it to your cake. This is so that the fruits will not make the cake go bad or taste funny after some time especially for Nigerian Wedding cakes which people like to keep for a longer time.
Brandy
The brandy is a preservative for the cake. With all those eggs in the cake, it can go bad before the event if you don't add brandy or any other cake preservative to it. Here, I am talking about if you will place the cake on the counter for a few days while decorating it (especially for wedding cakes). But if you are making a cake that you will throw into your freezer as soon as it has cooled down, then no need for the brandy.
But please do not go overboard with the brandy. You don't want people to feel tipsy after eating your cake.
Read more at http://www.allnigerianrecipes.com/cakes/nigerian-cake.html#eE6Mg5RzRFakY4mC.99
Tools You'll Need to Bake a Nigerian Cake
The following are the minimal tools you'll need to bake a Nigerian Cake:
- An oven with a top and down heating capability is best
- Cake mixer. Buy it in USA | in UK
- Kitchen scale: Buy it in USA | in UK
- Sieve or Sifter
- Egg Whisk.
- Bowls
- Spatulas
- Cake Pan: 10 inches in diameter and 2.5 inches deep.
More information about the Nigerian Cake Ingredients
The flour to use for your Nigerian Cake
You MUST use plain flour for you to have success with the Nigerian Cake recipe detailed on this page. I do not know what using a self-rising flour will do to your cake if you use it. The problem with self-rising flour is that they never state the amount of the leavening agent (in this case, baking powder) they added to the flour. This is why I prefer plain flour so that I have more control over the amount of baking powder that I add to the cake recipe.
The butter to use for you Nigerian Cake
For those living in Nigeria, please use baking butter NOT margarine. You should be able to buy baking butter from any shop that sells bakery ingredients. For my US audience whose butter comes in sticks. I don't know the weight of 1 stick of butter. Maybe this is written on the wrapping so you can check it and then know how many sticks correspond to 1.1 lbs.
Please do not melt the butter. Bring it out from the fridge the day before you make your Nigerian cake. This way, it will be soft enough for creaming on the day you'll bake the cake.
Sugar
If you think your granulated sugar is too coarse, you can grind it with a dry mill (the one used for grinding egusi, ogbono, etc) before adding it to the butter for creaming. You only need to grind it a little bit to reduce the size of the grains of sugar. This reduces the creaming time.
Flavour
The job of the vanilla extract is just to add a vanilla flavour to the cake. If you want another flavour such as butterscotch (used in wedding cakes) etc, please use it to replace the vanilla flavour and add it when I add the vanilla flavour.
Dry Fruits
If you want to add dry fruits such as raisins, please soak these in brandy for at least 1 week (up to 1 month for Nigerian wedding cakes) before adding it to your cake. This is so that the fruits will not make the cake go bad or taste funny after some time especially for Nigerian Wedding cakes which people like to keep for a longer time.
Brandy
The brandy is a preservative for the cake. With all those eggs in the cake, it can go bad before the event if you don't add brandy or any other cake preservative to it. Here, I am talking about if you will place the cake on the counter for a few days while decorating it (especially for wedding cakes). But if you are making a cake that you will throw into your freezer as soon as it has cooled down, then no need for the brandy.
But please do not go overboard with the brandy. You don't want people to feel tipsy after eating your cake.
Before you make the Nigerian Cake
- Make sure that all the utensils and appliances you will use for the cake are clean and dry.
- Check, check and check that you have all the ingredients you will need to bake the cake.
- Print out the Nigerian cake recipe and keep it close by. For those who prefer using the video, bring your laptop close enough. LOL
- Everything ready? Let's go!
Making the Nigerian Cake: Step by Step
1. Cream the butter and the sugar
Put the soft butter and the granulated sugar into the mixer and start creaming.
I used the highest setting on my mixer which is a 300 Watts appliance and the creaming took me a total of 1 hour.
Please follow the instructions in the user manual of your mixer when creaming. For my mixer, the instruction says that I should not run the appliance for more than 10 minutes at a time. So, I cream for 10 minutes, stop to let the mixer rest and cool down, I run it again for ten minutes etc. And it took me a total of 1 hour creaming time (stoppage time NOT included) to completely cream the butter and the sugar. Your own time may be more or less depending on the type of mixer you have and the size of the grains of your sugar.
A well-creamed sugar/butter mix should look much whiter than the butter you started with, softer (it should be able to drop from a spoon, see video) and you can barely feel the granulated sugar when you taste the creamed butter and sugar. Some granulated sugar may be stubborn and you can still feel the grains but it's OK so long as the butter/sugar mixture is as white and soft as possible.
2. Prepare your baking pan
When you are almost done with the creaming, prepare your cake pan by rubbing the insides with soft butter. Then put some flour into the greased pan, making sure the flour touches every part, then pour out the flour.
The greasing and flouring of the insides of your cake pan will prevent the cake from sticking to the pan thereby making it easy for you to bring out the cake from the pan when done, without denting the cake.
3. Beat the Eggs
Break all the eggs into a big bowl and whisk them to a smooth blend.
4. Add the eggs and mix
Before you do this step, you should make sure that your butter and sugar are well creamed.
If your mixer is big enough to accommodate the creamed butter and sugar with the whisked eggs, add the whisked egg into the mixer. Mix till you have a smooth fluffy blend of the creamed butter/sugar and the eggs.
If your mixer is not big enough, transfer the creamed butter and sugar to a bigger bowl. Add the eggs and use a hand mixer to mix the two till you get a fluffy smooth blend. My mixer is quite small so this is what I did in the video below. This took me about 5 minutes with my 300 Watts hand mixer which is extractable from my mixer.
5. Turn on your oven to preheat
It's now time to turn on your oven to 150°C or 302°F so that it can start heating up while you finish mixing the cake. You should also switch it to the up & down heat setting.
6. Add the ornamental ingredients
Add the vanilla extract or any other flavours of your choice, add the brandy and pre-soaked dry fruits (if any) and stir with a wooden spatula till everything is well incorporated. Add some browning if you are baking a Nigerian wedding cake. This is what gives the cake the dark colour.
7. Add the plain flour with the baking powder
- Now, add the baking powder to the plain flour.
- Put the mix into a sieve or a flour sifter. Add small quantities of the flour through the sieve/sifter into the bowl where you already have other cake ingredients.
- Stir very well with the wooden spatula. Add another small quantity of the flour with baking powder. Stir.
- Repeat this process till all the flour is incorporated. I warn you, this procedure can make your arm die a bit so be sure you are ready for the arm exercise before you start. :)
Notes:
It is advisable to stir the cake mix in one direction, in a folding fashion, when adding the flour because most cake experts say that when you stir in the opposite direction, air bubbles will be trapped in your cake mix and your cake will have holes in it when done.
It is important to pass the flour through a sieve or sifter so that you are sure that the flour that enters the cake mix in its finest powder form. You don't want to have small lumps of flour in your cake do you? This also ensures a very smooth cake mix.
8. Pour the cake mix into the greased cake pan
- Once every ingredient is well incorporated, it's time to pour the mix into the greased cake pan.
- If you want to make a multicolour layered cake then you should at this point divide the cake mix into the number of colours you want. Put these into separate clean dry bowls. Add the colours to each, stir well and pour into the cake pan one after the other. You should make sure you level out each coloured cake mix as much as possible before pouring another one.
- Once you've poured in all the cake mix into the cake pan, gently lift and drop the cake pan several times to level out the cake mix as much as possible (see video). Don't worry if the top is not so smooth, as soon as the heat of the oven gets to it, it will level out.
9. Baking Time!
- Transfer the cake to the preheated oven, placing the rack halfway between the top and the bottom of the oven.
- Bake for at least 2 hours before attempting to open the oven door to check the cake. It took my cake 2 hours to rise to maximum and if you open the oven door before the cake has fully risen, you have interrupted the baking process, the cake will stop rising, may not be evenly cooked when done and it will be harder than normal when done. There are endless things that can go wrong with your cake if you do not wait for it to rise fully before opening the oven door. That it smells like cake does not mean that it is done. :)
- Even though mine took 2 hours, you should keep an eye on yours till you notice that it is no longer rising before attempting to open the oven door. All ovens are not the same so you should use my baking time as a guide only.
10. Check the Cake
- After 2 hours, when I'm sure that the cake is no longer rising, I check it by driving a knife into the center of the cake. If the knife comes out with smears of the cake mix, then the cake is not done. If it comes out clean and dry, with only a smear of butter (oily look) then the cake is done. If the cake passes the knife test, I go on to do the other tests.
- The second way I check the cake is to take a look at the sides of the cake pan. The cake should be separated from the pan or at least not stuck to the pan.
- The third way I check that the cake is done is to dip a wooden skewer (stick) into the middle of the cake. Wooden skewers are a bit rougher than knives so they tend to pick up smears more. So if the wooden skewer comes out clean, the cake should be done.
- Even when my cake passes all of the above checks, I still carry out the fourth test so that I can be doubly sure that it is done before bringing it out of the oven. Nobody wants to end up with an undone cake. The fourth and final check I carry out is to gently push the cake down at the middle with my open palm. If the cake springs back when I lift my palm and there is no impression of my palm on the cake, then the cake is done.
11. Cool and Decorate/Refrigerate
Once you are sure that the cake is done, bring it out of the oven and leave it alone for only 5 minutes then take out the sides of the pan. Then leave to cool down completely before decorating the cake.
You can also cut it up in desirable sizes and store in the freezer.
That's how the Nigerian Cake is made. You can serve it up as a snack with a chilled drink or eat it as a dessert. When decorated, use for birthdays and weddings.
Efo Riro: A Yoruba Delicacy

Efo Riro is a rich vegetable soup that is native to the Yorubas of Western Nigeria. The vegetables that can be used to cook this soup are Efo Shoko or Efo Tete (Green Amaranth). If these are not readily available where you live, leafy or frozen spinach is a very good substitute.
If you cannot find the ingredients to cook Edikang Ikong soup where you live, Efo Riro is is a Yoruba version of Efik/Ibibio's Edikang Ikong.
Ingredients for Efo Riro
- Assorted meat and fish. use a combination of the following:
- Beef
- Shaki (cow tripe)
- Smoked fish
- Dry fish
- Stock fish
- 20 cl palm oil
- 500g Efo Shoko
- 5 tatashe peppers
- 2 tablespoons ground crayfish
- 2 red onions
- 2 small stock cubes
- 2 tablespoons locust beans (iru)
- Salt & Habanero / Scotch Bonnet peppers (to taste)
The following are the two vegetables that can be used in cooking Efo Riro. The first one and the first choice is Efo Shoko, the second is Efo Tete (Green Amaranth). Both are available in Nigerian markets.


Other meats you can add to Efo Riro:
The more the variety of meats and fish you can add to Efo Riro, the better so feel free to add: snails and other offals, ponmo (cow skin) etc.
Before you cook Efo Riro
- If you are using the hard stock fish, soak it for a few hours. Soak the dry fish till soft and debone.
- Cut the leafy vegetables
- Deseed the tatashe and grind till coarse.
- Prepare other ingredients: pound/blitz the pepper, dice the onions and grind the crayfish.
Cooking Directions
- Start cooking the shaki first with as little water as possible (see video below) as it is the toughest meat in the bunch. This soup should have as little water as possible so add small amounts of water at a time and top it up as you cook.
- When the shaki starts to curl, add the dry fish and stockfish.
- When the shaki is almost done, add beef, stock cubes and some of the onions and cook till all the meat and fish are well done. Set these aside.
- In another pot, pour the palm oil and heat it up. Once hot, add the remaining onions.
- Fry the tatashe peppers till there's no more water in it. This should take about 15 minutes.
- Add the locust beans, crayfish, and stir very well.
- Add the cooked meat and fish, stir very well.
- Add the vgetables, stir very well, cover and once it heats up again, add salt to taste and take the pot off the stove.
Serve Efo Riro with Semolina, Amala, Pounded Yam, Eba or any other fufu meal. It also goes well with boiled white rice.
Nigerian Afang Soup Recipe

The Nigerian Afang Soup, like the Edikang Ikong soup, is native to the Efiks, people of Akwa Ibom and Cross River states of Nigeria but enjoyed by all Nigerians. It is also very nutritious as the soup consists mainly of vegetables. Afang Soup is prepared with a generous quantity of Water leaves and the wild herbal Okazi leaves.
The Nigerian Afang Soup should not be confused with the Okazi Soup native to the people of Imo and Abia States of Nigeria. While Afang soup is prepared with basically vegetables, Okazi Soup is simply the Nigerian Egusi Soup cooked with thinly sliced Okazi leaves.
Ingredients for Afang Soup
- 400g sliced Okazi/Afang leaves | about 4 handfuls
- 250g Water leaves
- 20 to 25 cl red palm oil (about 1 drink glass)
- Beef, Kanda and Dry fish
- 2 tablespoons ground crayfish
- Pepper and salt (to taste)
- 2 stock cubes
Notes on the ingredients
- Great alternative to water leaves is Lamb's Lettuce, known as Canonigos in Spanish.
- Yes, you need that much palm oil. :)
Before you cook the Nigerian Afang Soup
- Wash, drain and slice the water leaves into tiny pieces. Grind or pound the sliced Okazi leaves. In Nigerian markets, the sellers of these sliced Okazi leaves have a machine for grinding it. You can also grind it with your blender with a small quantity of water. Take a look at the ground Okazi leaves.
- Grind your pepper and crayfish and cut the onions into tiny pieces.
Cooking Directions
- Boil the beef and Kanda with the diced onions and stock cubes in a very small quantity of water. When done, add the dry fish and cook for about 5 more minutes.
- Now add the palm oil, crayfish and pepper. Once it starts boiling, add the afang (okazi) leaves, water leaves and periwinkle. When the okazi leaves have softened and the water has dried up a bit, add salt to taste and leave to simmer for about 5 minutes. The Afang soup is ready!
Bitterleaf soup – Ofe onugbu (as the Igbos like to call it) is very delicious and also comes third on my list of Nigerian popular soups.
This soup is popular because it could be made in more than five different ways and can also be refrigerated for a very long time (even though I recommend two weeks at most for most Naija soups)
Here is a guide to making the much talked about “ofe onugbu”. I stated in the download-able Nigerian foods Eguide that most Nigerian soups are named after the leaves or the thickener used in making them.
This soup can be made with either egusi (melon seeds), ede (cocoa yam), ofor, achi or even ogbono. Yes, we made the ogbono soup video with bitter leaves. But the most popular of them all is the cocoa yam and bitter leaves and that is what you will find in the video below.
how to prepare Bitterleaf Soup (Ofe Onugbu)
Bitter leaf soup, like most other Nigerian soups is named after the particular leaf which is used in preparing it. But of course you need to wash this leaf to remove at least ninety percent of the bitter taste, just so you don’t end up with a very bitter soup.
Ingredients For making Bitterleaf Soup
This would serve about ten person person or more depending on stomach size and all. You are free to increase the size of the ingredients if you want to serve a larger number of people. You can also refrigerate the remainder in case you have a smaller family.
Ingredients For Nigerian Bitter Leaf Soup
- 2kg Meat of choice (beef, chicken, pork, turkey)
- Bitter leaf (wash to desire)
- Half cup of ground Crayfish
- Maggi or knorr seasoning (3 cubes
- Ogiri (a product of castor seeds)(optional)
- Dry fish (2 medium sizes)
- Stock fish head (1 big size)
- Palm oil (about 25cl)
- Salt and pepper to taste.
- Cocoa-yam (pounded)
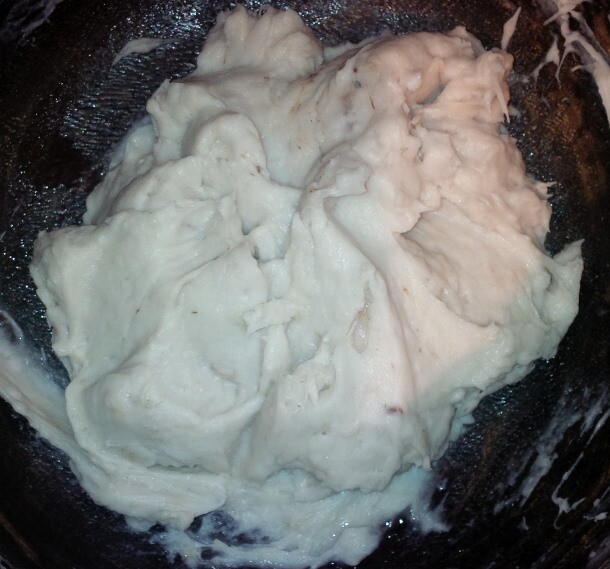
The bitter leave soup takes almost the same process as the making of uha soup, as a matter of fact, one pot of soup could be cooked up to the point of adding the leaves then you divide it to add uha to one and bitter leaf to the other.
Below is the images for Ofe Onugbu (bitterleaf soup)
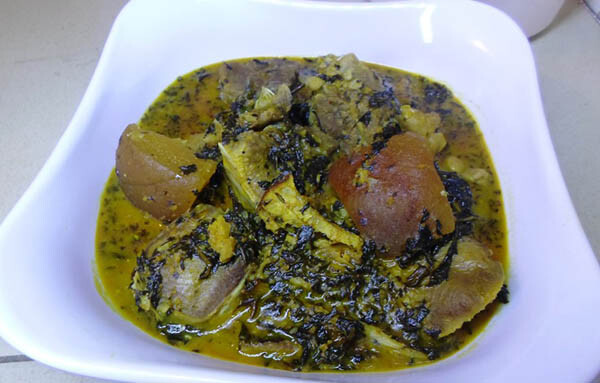
It is better and more hygienic to wash the leaves yourself, it is a bit of time consuming but the result is worth the effort. This is possible if you live in Nigeria and can find them in your garden. But you can also get the “already made” from any market in Nigeria.

Bitter Leaf Soup Preparation
To soften the leaves and further remove the bitter taste, it is advisable to boil alone in ordinary water for 10 to 15 minutes, most people like to add a little quantity of edible potash to hasten this process but I highly advise against it. My reason being that this catalyst (potash) tend to affect the entire soup in a slightly negative way.
If you still want to add potash, it will completely wash off the bitter taste and soften the leaves in less than 3 minutes of boiling (the reason most people like using it), but then you would want to boil again alone and wash thoroughly with just water to remove every trace of the potash.
Parboil meat with every necessary ingredients, use 3 cube of maggi or knorr, a teaspoon of salt and half cup of onions. Allow to boil for 10 minutes then add water and cook till the meat is tender.
Add the (hot-water) washed dry fish, stock fish and cook until it is tender, add more water then add palm oil, ground crayfish, pepper, maggi seasoning, salt and pepper to taste. Stir and allow to boil.
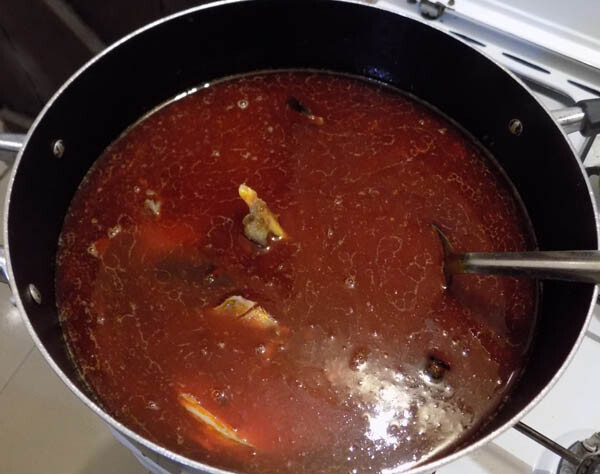
At this point it should give a good soupy taste (even though it would be watery). Then add the pounded cocoa yam as you can find in the video below (at this point you can add the ground egusi if you choose to make bitter leaf soup with egusi), also add the ogiri now.
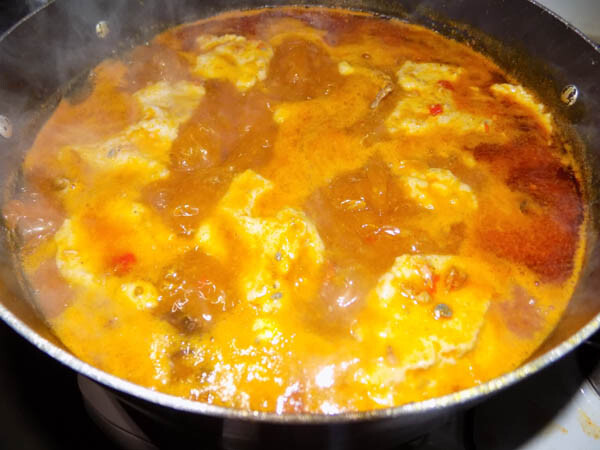
Cook till the cocoa yam dissolves, (this would likely take about ten minutes) then add the bitter leaves, stir, taste, add more salt if necessary then cook for three to two minutes and you are done with the making of Nigerian Bitter Leaf Soup (Ofe Onugbu)
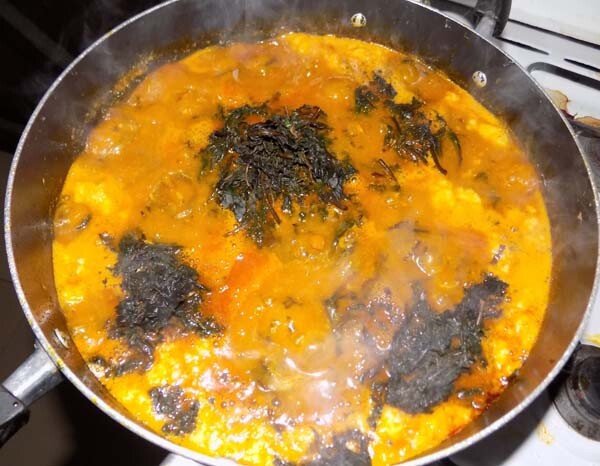
Either of these five can go along with it – Eba, Fufu, Semo, Wheat or pounded yam


Hello, an amazing Information dude. Thanks for sharing this nice information with us. Best West African Restaurant UK
ReplyDeleteNice articles and your information valuable and good articles thank for the sharing information Salmon and egg cat food mix
ReplyDelete